Daze wrote:
Installing a T5 in a classic Ford, other than a Mustang
When I first sat down to put this info together my intent was to document the install of a T5 into my 1962 Ford Galaxie, but as the project unfolded I realized that much of what I was writing applied to installing a T5 into just about any classic Ford, especially some of the tips and tricks for actually putting the transmission in. The T5 is very similar in size and shape to the manual transmissions that originally were available for these cars, which makes the install fairly easy in any classic Ford.
"Other Than a Mustang"??
This swap is very popular in the Mustang community and because of that there is a lot of aftermarket parts support. There are also many good articles on the Internet detailing a T5 install in to a classic Mustang. This is not the case for those working on a classic Ford other than the Mustang. Taking my lead from the Mustang community I was able to apply the same basic concepts and install a T5 in my Galaxie and this info should apply to any classic Ford.

T5 Transmission in a 1962 Galaxie
In 1962 there were lots of transmission options for the Ford Galaxie: 3-speed, 3-speed overdrive, 4-speed, Ford-O-Matic, and the Cruise-O-Matic. These transmissions worked well and are still a quality options for today’s restored cars, but for my 62 Galaxie I wanted something more, and decided to install a T5 manual transmission. The biggest benefit of the T5 is the overdrive 5th gear. By having an overdrive you have the ability to run lower rear gears for more off the line power, but still have a car that will turn a reasonable RPM at highway speeds. To begin my project I had to find a transmission that would work for my application.
Finding a T5
The T5 is a solid 5-speed transmission that was available in the Ford Mustang and several other Ford cars, for many years in the 80s and 90s. The T5 came in many different configurations but the two main classifications are “non world class” and “world class.” T5s built prior to 1985, are non-world class, use gear oil and are not as strong as the world-class transmissions. World Class T5 were made from 1985 on and use ATF as lubrication. There is also several differences between the T5s found behind 2.3L engines and 5.0L engines; include gear ratios, input shaft size and over all transmission strength.
Most people looking to put a T5 in their Mustang or any other classic Ford seek out a World Class transmission from an 85-93 5.0 donor car with 90-93 being the strongest option.
Where you get your T5 really depends on your budget and abilities. In most areas a rebuildable core can be had for around $200 or less, but if you do not have the skills or tools to rebuild a transmission your self, you will have the added cost of the rebuild. Fully rebuilt T5 transmissions are easy to find on places like eBay and many other aftermarket T5 sources but will usually cost you a grand or better. In some cases you might be looking for a used working T5. The trick with this goal in mind is to insure that the T5 really is working rather than just an overpriced core.
The best option for knowing if a T5 is good is to drive the donor car with the T5 in it. Unfortunately in most cases this is not an option as the transmission has already been removed. With the transmission out of the car it can be very hard to tell the true condition of the transmission however, there are a few things you can do to increase your odds of getting a good one. The main purpose of all of the following tests is to separate the high mileage transmissions from the lower mileage transmissions.
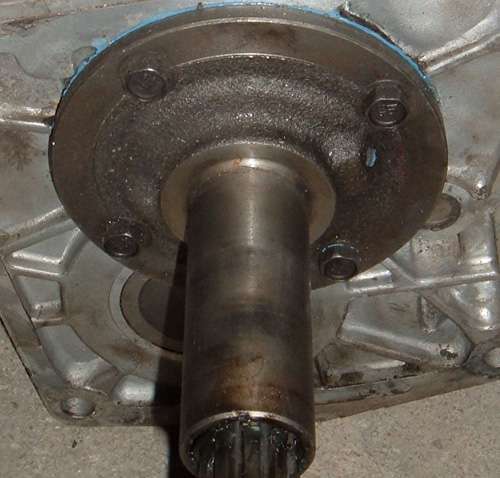
The first thing you can do is inspect the input shaft tip and clutch splines for excessive where. A transmission that has a lot of miles on it will show a lot of ware in these two locations. The next thing you can do is to spin the input shaft paying special attention to how smoothly it turns, also be aware of side to side play in the shaft which would indicate worn bearings. You can also push on the input shaft with one hand and with a finger from the other hand on the output shaft feel for motion on the output shaft.
If the bearings are worn there will be quite a bit of movement in the output shaft when you push on the input shaft. As a further test you can install a shifter and run the transmission through the gears making sure it shifts smoothly and does not hang up before going in to any gear. These things will not insure you get a good T5 but will help you weed out any really bad ones.
Rebuild it Yourself
If you have never rebuilt a transmission, or other gear type automotive part, the T5 is an excellent first rebuild. The reason for this is that it is really hard to put one together incorrectly. 99% of the parts will only fit one way, which makes the rebuild almost foolproof….. almost. Another reason that the T5 is excellent beginners rebuild is that the full rebuild manual is free to download and there are several videos available that take you through the complete rebuild process.
Such videos are a wonderful resource and give you the opportunity to watch some one else do it and see where everything goes. Even better yet if you get to a part of the rebuild where you are struggling you can simply go back and watch the section of the video that covers the current phase of the rebuild.
For my project I chose to rebuild a T5 that I was given. It was my first transmission rebuild, but I was able to fully rebuild the transmission with out issue.
I built the unit using stock gears bearings, and cluster but did upgrade the bearing retainer on the front of the transmission to a solid one piece steel unit.
I also upgraded the counter gear stabilizer in the transmissions.
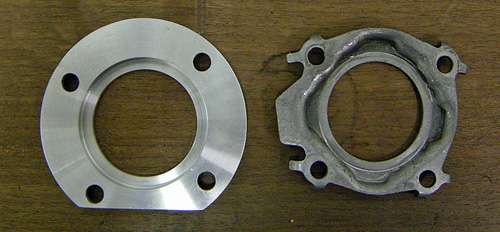
As you can see from the pictures solid counter gear stabilizer is a much stronger part than the original stamped steel retainer. The biggest advantage to a solid piece like this is that unlike the stamped piece a solid retainer will not stretch during use. This insures that the counter gear cluster is always correct orientated and never floating in the case, which strengthens the over all torque and horse power ratings of the transmission. Once I had my transmission together I was ready for it to go in the car.

Changing the Engine?
There was a time when there was a major drawback to upgrading to a T5 transmission especially for cars like the Galaxie, and that was that a T5 would not bolt directly to anything except the 6-bolt Windsor series small blocks. In the case of a Galaxie this is a major issue as those prior to 65 did not come from the factory with a 6-bolt small block Windsor and the majority of these cars came with the FE series engines.
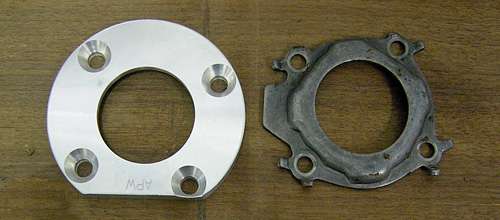
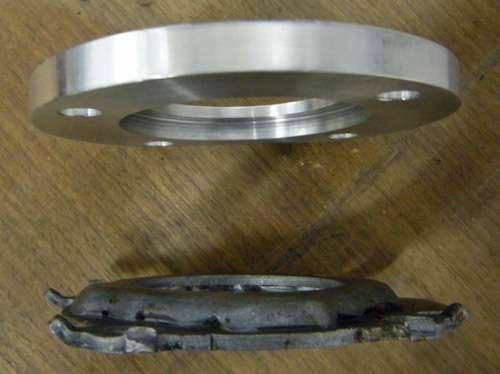
In the case of an FE, not only was the transmission bolt pattern different, but also the input shaft on a T5 is much longer than the input shaft on the original manual transmissions found in these cars. The Input shaft length differences, between a T5 and an FE type 3-speed or 4-speed, could be over come by using a FE truck bellhousing and a T5 adapter plate between the T5 and the bellhousing, but I prefer a one-piece bellhousing to this type of system. A much better option comes from a company called quicktime that now makes a bellhousing designed to bolt a T5 directly to an FE series motor.
For my 1962 Galaxie T5 install, upgrading to a T5 bellhousing was as simple as finding a 5.0 T5 bellhousing and bolting it up. This was due to the fact that when I first got my Galaxie mobile, I did so by removing the FE series 352 and installing a 302 from a donor 84 mercury grand marquise. Using the OEM T5 specific bellhousing not only made the install easier but also allowed me the opportunity to upgrade to the smoother action of a hydraulic clutch, and I had the added benefit of being able to use an OEM type mini starter used in 1993 Mustangs.
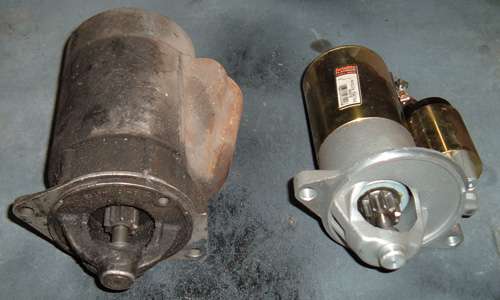
An OEM starter is far less expensive than the aftermarket mini starters available, is much smaller than a typical Ford starter and cranks the engine faster with less draw on the battery.
Flywheel Weight
When installing a T5 it is important to make sure you have the correct flywheel balance regardless of the motor that you are bolting the flywheel to. Obviously you want to use the correct balance for your application. Also when using a T5 specific bellhousing you need to make sure your flywheel will except a diaphragm clutch. In many cases theses more modern diaphram type clutches have metric bolt patterns, which require a matching flywheel.
With that in mind balance is even more important if installing a modern 302 flywheel on an older Windsor series small block. Ford balanced their Windsor series engines two different ways. All 221, 260, 289, and 351 engines were balanced at 28 ounces. The issue comes with the 302. All 302 engines made prior to 1982 have a 28-ounce balance, but all engines made from 1983 up are balanced at 50 ounces. As is typical of Ford in the transition year of 1982 you have some of both. You must make sure you have the correct flywheel balance for your application because if you put the wrong flywheel balance weight on an engine it will shake like it is trying to come apart.
This is especially important to keep in mind because the flywheels fond in front of most T5s in an OEM application are going to be of the 50 ounce weight and that means if retrofitting your T5 to an older Windsor series engine an aftermarket 28 ounce T5 flywheel will need to be purchased, or the original 50 ounce flywheel will need to be rebalanced by a machine shop.
Install
The over all install of a T5 in to a 62 Galaxie is really no different than any other manual transmission in any other car, however, there are several tips and tricks that I have learned that you can use to make sure the install goes as easily as possible.
Grease as a Bearing Removal Tool
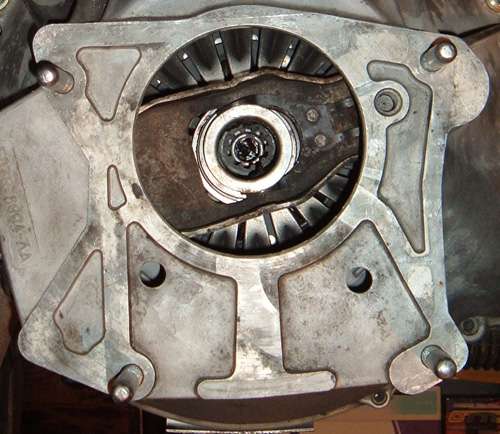
The first thing that needs to be installed in the car is a new pilot bearing. Even if the car was a manual transmission before it is still a good idea to get a new roller stile pilot bearing designed for the 85-93 Mustang with a 5.0. To get the old bearing out simply use a grease gun and a 5/8” piece of round stock. What you do is squirt grease in to the cavity behind the bearing and then place the round stock into the bearing opening and tap the rod with a hammer.
Just like hydraulic fluid the grease will not compress and as you force the grease into the cavity behind the pilot bearing it will push the bearing out. It will probably take several liberal applications of grease and several taps of the hammer on to the rod to get the bearing out. Once it is out clean the opening with a rag and install the new bearing.
From there the normal parts that need to be installed can be: block plate, flywheel, clutch, and clutch pressure plate. When torquing down flywheel bolts I use a steel rod between the floor and one of the side teeth on the flywheel to keep the flywheel from turning as you as the bolts are torqued. When installing the clutch make sure to use a clutch alignment tool as you tightening down the pressure plate. This will position clutch close to the correct alignment which in turn will make the install of the transmission much easier.
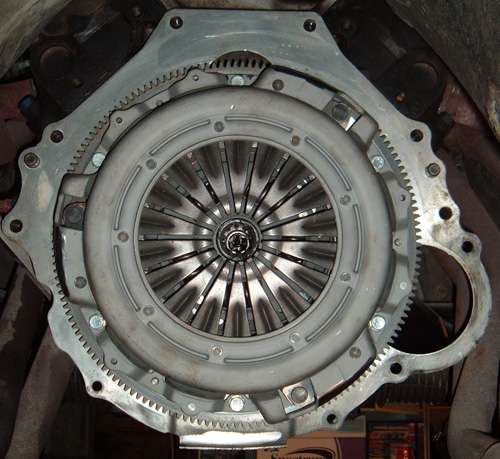
With all the internals of the bellhousing installed the bellhousing can go on. Don’t forget to install a new throughout bearing on the clutch fork. With the bellhousing installed it is a good idea to turn the engine by hand to insure that there are no clearance issues between the pressure plate and bellhousing. Once you know everything clears, you are almost ready to put the transmission in, however there are a few more tips that will make putting the transmission in a little easier.
Take the Shifter Off
Due to the fact that the shifter bolts to the top of the T5 tail shaft housing, it may seam like a good idea to try and install the transmission with the shifter already installed on the transmission, but unfortunately this is not the case. Attempting to install a T5 with the shifter on will drastically reduce the clearance between the top of transmission and the transmission tunnel as you install the transmission which reduced clearance making it much harder to line up the input shaft with all the parts in the bellhousing. Prior to removing the shifter, make sure the transmission is in gear. The reason for doing this is so rotating the output shaft will turn the input shaft and allow you to line the input shaft splines up with the clutch splines.
Plug The Holes
When installing the transmission it is important that dirt and other contaminants do not get in the transmission and fluids do not get out. There are three main holes that need to be plugged. Start with the shifter opening. This needs to be covered with tape so that dirt from the underside of the car does not fall in to the opening.

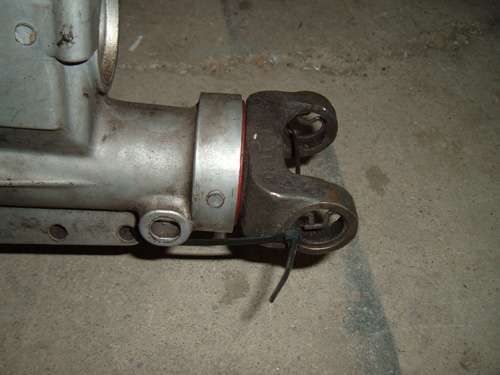
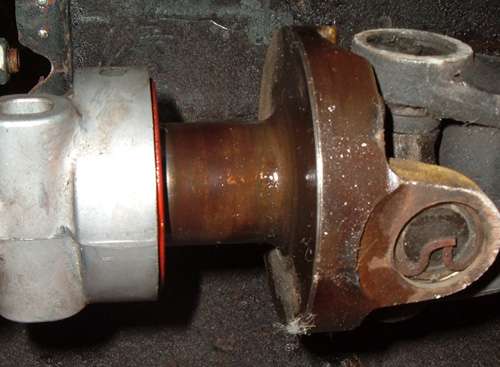
If installing the T5 dry, plugging the next two holes is not as critical but if the transmission has fluid in it than it is a must, to avoid spilling fluid all over yourself and or the floor. The two holes I speak of are the tail shaft opening and the speedometer gear opening. To plug the tail shaft opening simply slid a slip yoke in to the back of the transmission and secure it with string, wire, or a couple of zip ties.
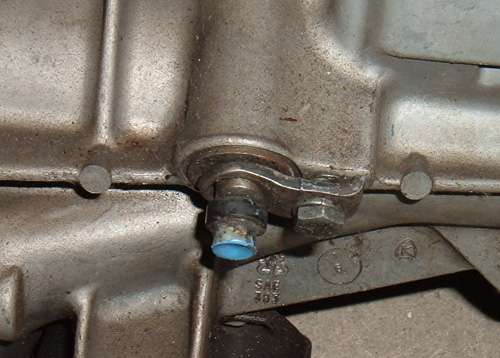
To plug the speedometer hole I took the end off of a bad speedometer cable, removed the cable and plugged the hole in the middle with some oil resistant silicone.
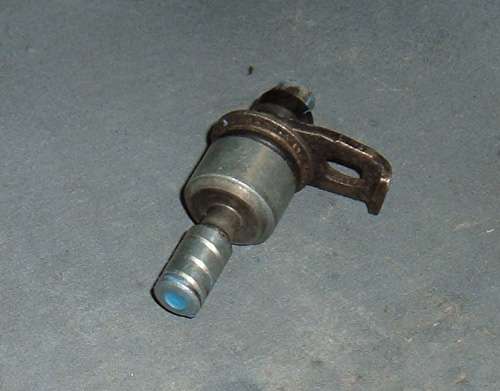
This provides me with the perfect plug for the speedometer gear hole.
Guide Studs
Guide studs are one of the simplest things you can make and yet one of the most effective in making the actual install of many different parts easier. I have a whole collection of guide studs that I have made for all sorts of applications such as installing an intake manifold, lining up a flywheel on the crank and for this project, installing a T5 transmission. All you need to make a guide stud is a bolt that is about 1” longer than the OEM bolt for its intended location and a way to cut off and round the head. Once you have them made you simply screw them in place and in theory slide the part over them.
When using guide studs the only thing you need to remember is after the part has been installed, only remove one stud at a time and replace it with the actual fastening bolt prior to removing another guide stud.
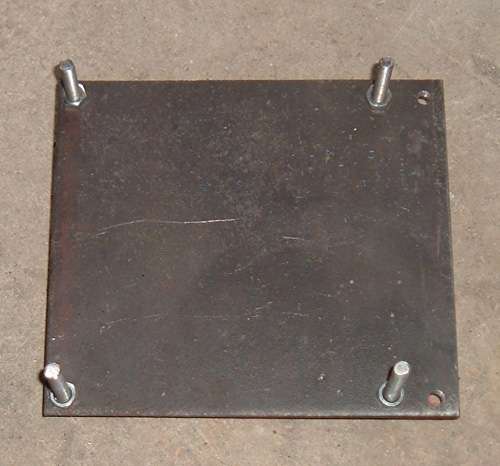
Jack Plate
For those that do not have the benefit of a transmission specific jack, on some transmissions like the toploader there is a natural place on the bottom of the transmission where you can put a regular floor jack to help get the transmission up in the air . This is not the case on a T5. All of the places where you can stick a jack do not provide a solid enough mounting point or a good balancing point. This makes the transmission extremely unstable as you jack it up, which in turn makes lining everything up even harder. By making a jack plate out of a flat piece of steel and some all-thread or a few bolts you create an adjustable platform that provides a flat place for the jack to rest and a stable cradle for the T5 to sit in.

Stab the Transmission in
This can be the single hardest part of a T5 install. The input shaft has to pas through the bellhousing opening, into the throughout bearing, through the clutch and then in to the pilot bearing. Not only does the transmission have to be at the correct angle so that the input shaft is perpendicular to all these parts, but all the parts in the bellhousing must be perfectly lined up. Chances are this is not going to be the case as the throw out bearing and clutch fork have a lot of play in them and the clutch will probably be slightly off even if a clutch alignment tool was used.
The first thing to deal with is the throughout bearing. This can be done by either having some one else hold the clutch fork stationary or by tying or taping it in place. This will allow you to get the input shaft in to the bellhousing and through the throughout bearing. Once the transmission is installed far enough that the input shaft is through the throughout bearing you should be able to get the transmission mounting holes on to the guide studs.
As you slide the transmission further in it will probably bind up as the input shaft splines catch on the clutch splines and you will need to turn the output shaft to get the input shaft to line up with the clutch. Once the splines are lined up the input shaft should slide through the clutch as you to push the T5 in a little further, but chances are it will get stuck again with the front of the T5 case about 3/4" away from the bellhousing.

This issue is caused by the clutch not being perfectly lined up with the pilot bearing. The clutch being slightly off will pull the input shaft out of alignment with the pilot bearing hole causing the tip of the input shaft tip to bind against the pilot bearing.
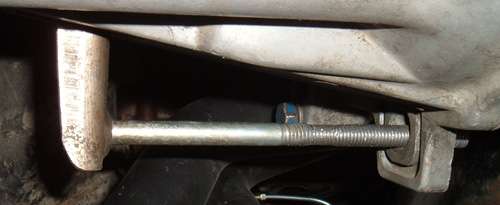
Clutch Engagement Tool
A very common mistake made during this part of a transmission install is to use the mounting bolts to close the 3/4" gap. If you install the mounting bolts and then tighten them down the transmission may slide in to place however you run the risk of damaging the clutch, input shaft and or pilot bearing as well as potentially cracking or breaking off the transmission mounting tabs.
A much better solution is to disengage the pressure plate from the clutch allowing the clutch to slide in place. On a T5 this can be done by placing a long bolt or piece of all thread through the clutch fork and the OEM cable mounting tab on the bellhousing and then tightening the nuts down until the clutch can move freely.
Once the clutch is loose the transmission should slide right in. From there you can bolt it in place and then move on to the transmission crossmember.
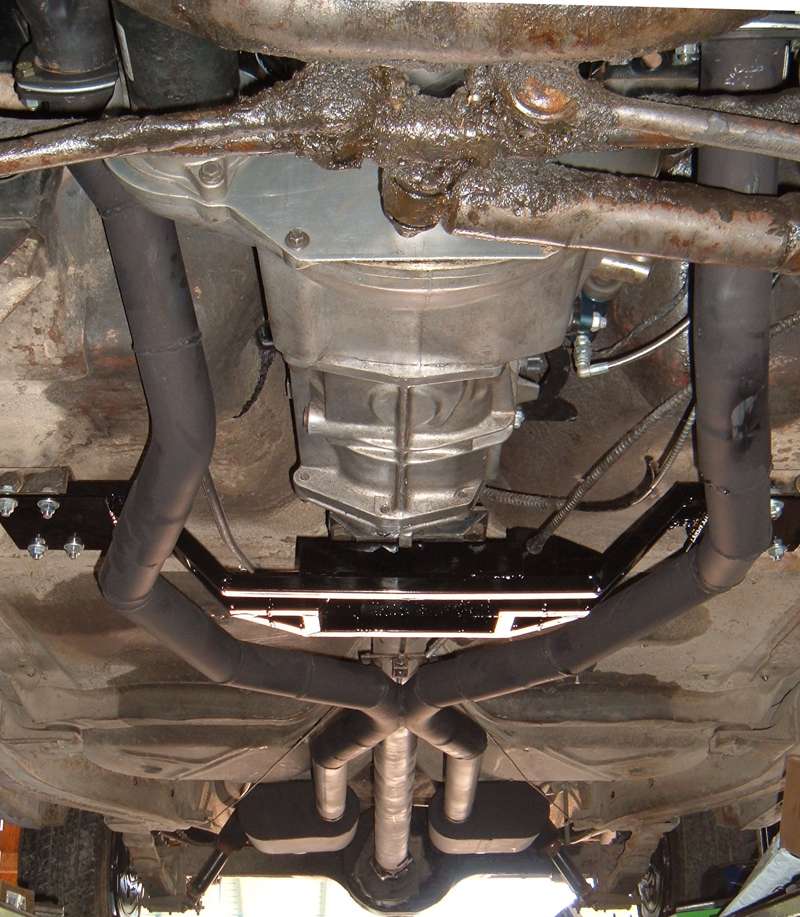
Building a Crossmember
In many cars like my 62 Galaxie the transmission crossmember had to serve a dual purpose. It not only holds the transmission in place, but also ties the two frame rails together. This means that it is a structural component of the car and weather you choose to fabricate a new one or modify the original transmission crossmember you must keep strength in mind.
Like I said in the beginning of this article, this install, unlike a Mustang T5 install, does not have the benefit of aftermarket support. Since I could not buy a crossmember, I chose to build one from scratch using 3/4” square tubing.

The easiest way to build a crossmember from scratch is to do it in three separate pieces. Build the flat piece that goes across the bottom of the transmission mount, then build the two pieces that attach to the frame. The three pieces then need to be bolted into the car, and the transmission needs to be correctly centered in the transmission tunnel.

From there you can tie the tree pieces together by tack welding some scrap steel between the center piece under the transmission and the two pieces at the frame.
With the three pieces tacked together the full assembly can be removed from the car and new pieces can be cut and welded in to place so that the scrap steel can be removed. Make sure the new pieces are only tack welded and that you test fit the crossmember one more time before you burn it in permanently. Once you have it built you can paint or powder coat and then install it.
Getting the Rest of it Hooked Up
The rest of the install is just the basics, hook up the clutch linkage, (in my case hydraulic) https://www.fordmuscleforums.com/transmission-articles/481776-hydraulic-clutch-classic-ford.html pull the plug and install the speedometer cable, then install the drive line.
Slip Yokes and Drive Lines
It is important to have the correct slip yoke for a T5, but the good news is you may be able to use the one you already had with a little modification. T5 and AOD transmissions both use the same slip yoke. The C4 and Toploader also use a slip yoke that can be made to work. The slip yoke on the C4 and toploader has the correct splines but is to long.
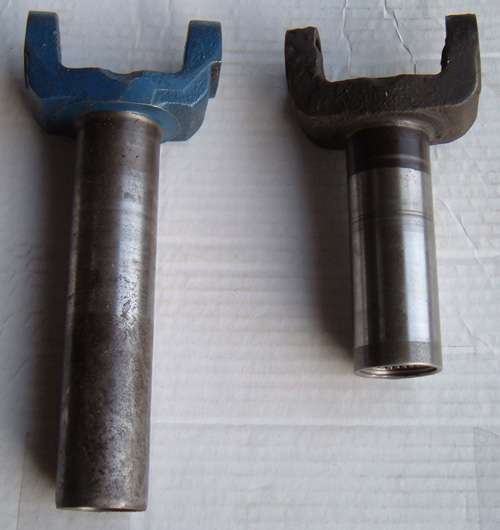
All you need to do is cut off the unsplined section of the yoke and you will have converted your C4 or toploader slip yoke in to a T5 slip yoke.

In most cases installing a T5 in your classic will require you to have some drive shaft work done, when taking your measurements make sure you have .75” to 1.5” clearance between the end of the transmission and the shoulder of the slip yoke.
On the T5 install in my Mustang the drive shaft was about .5” to long prior to having drive line work done, but on the Galaxie T5 install the drive shaft was about 7” to short. Take your drive shaft to a shop with a good reputation, and even if it costs extra, make sure you have it balanced.
Adding Fluid
The easiest way to add fluid to a T5 is trough the shifter opening. There is a drain hole in the shifter opening that drains in to the tail shaft housing and from there in to the main case. To fill the oil, with the car level, remove the fill plug and begin poring oil in to the shifter opening until the oil comes out the fill plug opening.
Keep in mind that it may take a few minutes for the fluid to drain in to the main case so to avoid a mess add the fluid a little bit at a time especially after the first two quarts have been added.
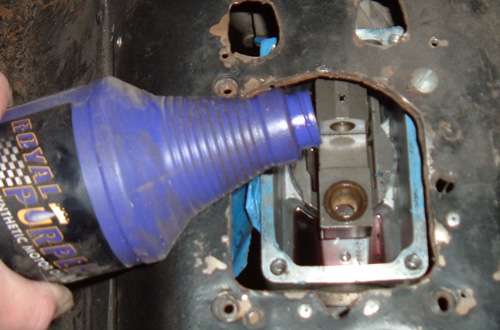
As I said before world class T5 transmissions use ATF as a lubricating oil, but there are also companies out there like royal purple that make a fully synthetic manual transmission fluid specifically for manual transmissions that use ATF. The advantage of a fluid like this is that it is specially formulated to prolong the life of synchronizers.
Final Thought
Over all this was one of the best upgrades I have made to the old Gal. That car has a lot of weight and that 302 needed all the help it could get to move that weight. By installing the T5 I am in control of the shift so I can maximize power and the lower first gear ratio gave me more off the line power. Don’t forget the added benefit of that 5th gear. Galaxies are wonderful cars to cruise in and being able to drop the RPMS down at highway speeds only adds to the cursing enjoyment.


 1 of 1