This forum is for all years of the Ford Galaxie and all other Full-size Ford, Lincoln, and Mercury cars. This is a place to share information, skills, pictures, and stories for the purpose of building friendships and furthering the enjoyment and restoration of these cars |
1 of 1
Offline
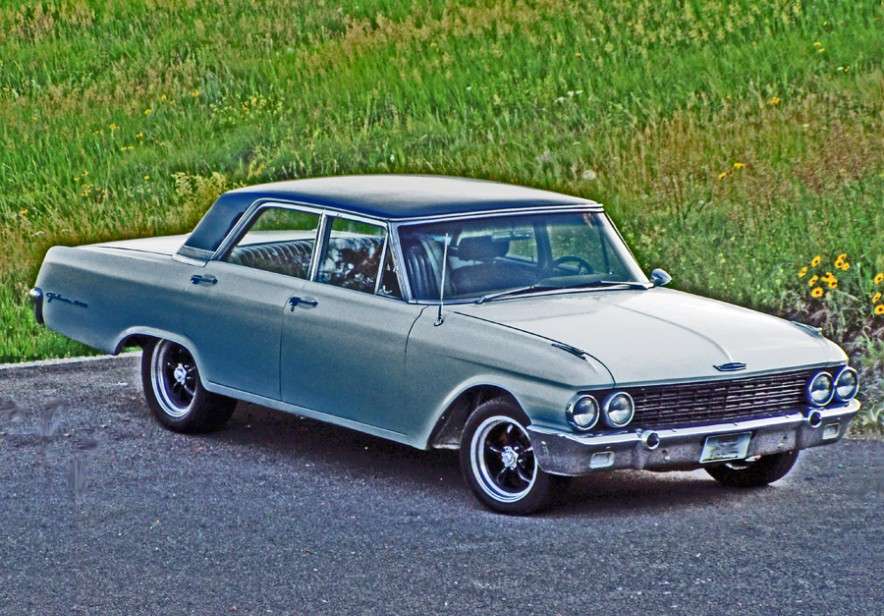
I have now built or reworked the transmission crossmember on my 62 galaxie 5 times. Most recent of which had to do with my engine swap. (If you are not familiar with all the headaches a couple of engine mounts caused me I have reposted it below.)
First time: When I bought the old gal the engine had thrown a rod and the transmission allowed the car to freewheel in park. I had an 83 Mercury with 302 and AOD in it so I pulled the drivetrain from the Mercury and dropped it in the old gal. At the time I had not done much fabrication, in fact I had just bought my first welder. The OEM transmission crosmember was not even close to fitting so I used what I had, a piece of angle iron, to temporarily hold the transmission in place. It was crude and nothing I would have left on their permanently but it was good enough to allow me to pull the car in and out of the garage to work on it.
Second time: This was my first official from scratch fabrication project. I used some 3/4" square tubing and a scrap piece of plate to create a custom crosmember. It worked well. Not perfect by any means but being the first time I had fired up the welder for a project like this, I was happy with it.
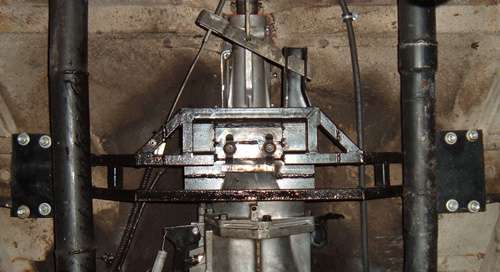
Third time: I decided to replace the AOD with a manuel T5. At the time I figured it would be a piece of cake, I new that the AOD and the T5 were the transmission options on a lot of 80s era cars so I assumed the crosmember would bolt up no problem. I was wrong. The depth was correct but the slots in the crosmember were not long enough to allow the T5 mount to fit. At the time I was in a hurry as I just wanted to get to T5 in so I hacked up the crosmember to get it to work. Here is a pic of version 3
Fourth time: Recently, May 2012, I replaced the 302 with a fresh rebuild. As is mentioned below I used Foxbody Mustang engine mounts, and as a result the engine and transmission were moved forward 1" (BTW had I replaced the engine mounts when I swapped out the AOD for the T5 I would not have had to modify the crosmember the third time) Being older, wiser and far more experienced in fabrication, I decided this time to totally rebuild the crosmember, not start over, but modify what I had to work better. I fixed several things that should have been done differently when I first built it and I completely removed the deck plate with the slots and subsequent hack job to lengthen the slots, and welded in a new one. I also tweaked the height to get the transmission a little closer to the transmission tunnel. I was extremely pleased with version 4 and almost took it to the powder coater, but decided to finish the exhaust before I had the crosmember powdered. It is a good thing I didn't have it powdered yet!!
Fifth time: When I built the crosmember initially I cut the e-brake arm off of the OEM crosmember and had welded it to the main body of the new crosmember. This made the cables hang dow a little lower than I wanted but since there were no clearance issues there was no problem with it (it was dual exhaust with no crossover pipes ). As I started to put in the new custom exhaust it became clear that I needed more room due to an x-pipe in the exhaust near the end of the transmission. So once again the crosmember needed to be modified. I cut off the e-brake arm as well as the plate installed to secure the e-brake cable and relocated them almost 2" higher. I have now modified the crosmember for hopefully a fifth and FINAL time. Again I am happy with the result and some of these modifications could not have been avoided but man I wish I hadn't had to rework this thing 5 times.
on July 28, 2012, 10:29 am Daze wrote:
A tale of two engine mounts
Back in May I made a post about my 62 getting a heart transplant. I installed a new 302. The car is still not on the road because this has turned out to be way more than a simple engine swap. all because I change the engine mounts.
If you go back even further, back in October I made a post: just got a whole lot easier to put a modern Ford small block in a 61 62 Galaxie
Here is an abridged version of that post:"what motor mounts do I need to put a 302 or 351 in my 61 or 62 Galaxie." and my answer has always been.
In 63 the 289 became an engine option from the factory which makes swapping a windsor in to a 63 and up cars a piece of cake, however the 63 Motor mounts will not work in a 61 62 car with out modification. The 63 mounts are the same as the the early Mustang mounts, they will bolt to the windsor motor but the stud slots in the engine bay on a 61 or 62 k-member are to far apart for a windsor motor. I installed a 302 in my 62 and used the Mustang mounts and then bolted a 1/2" plate to the top of them and then bolted the plate to the motor. This allowed me the extra width I needed to make them fit.
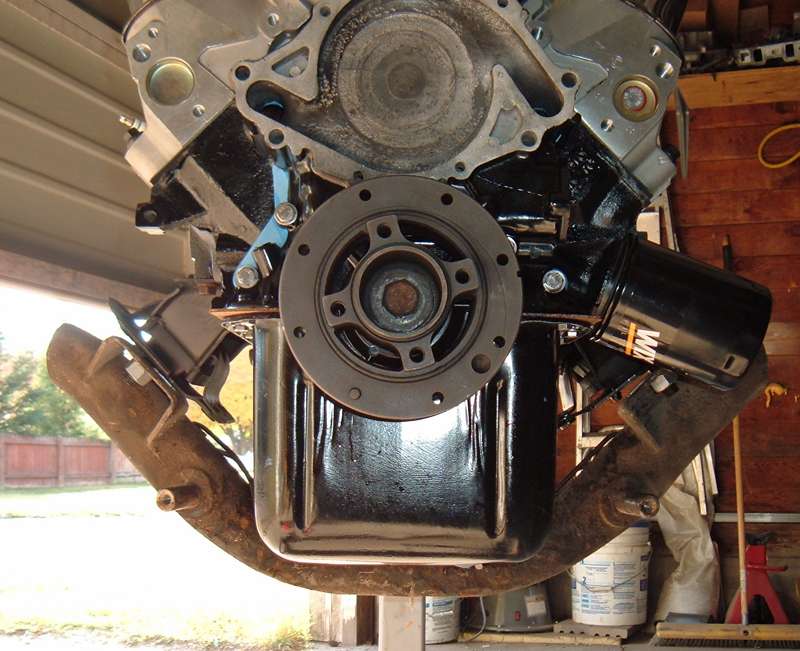
This system has served me well for the last 8 years however I never liked the way it looked and I have tried to come up with a better option short of fabricating up my own mounts from scratch. I had given up until I was watching Musclecar and they were dropping a 331 stroker in to a foxbody Mustang. To my surprise the engine mounts they used were stud type and a bit wider than the early Mustang/galaxie windsor type mounts. I did a little research online looking at pictures and found the part numbers for these mounts are: anchor 2725 and 2726
Armed with these numbers I went to my local parts store and picked up a set. I brought them home, bolted them to the 302 sitting on the stand weighting to go in the old Gal AND bolted up a K-member I had cut from a 61 Galaxie. To my delight they fit like Ford had designed them to put a windsor in a 62 Galaxie.
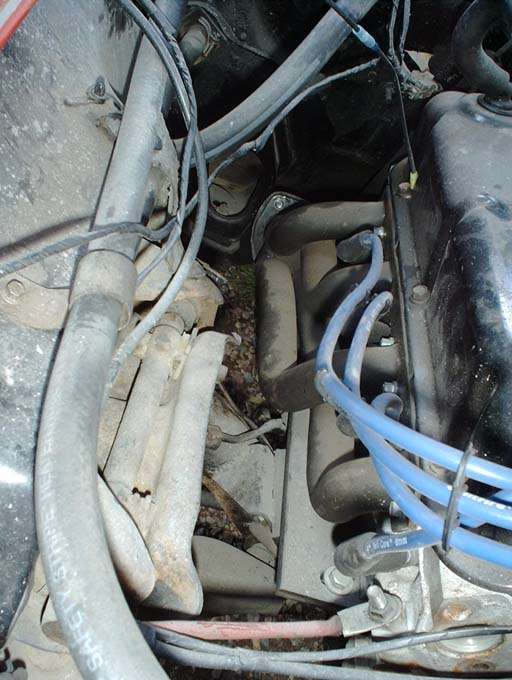
I took some measurement comparing the k-member location to engine location on both my car and the engine on the stand and it looks like they are about the same so I should be able to drop the new engine in using these mounts.Fast forward to when I dropped the engine in and the word "should" came back to bite me. My original mounts and the new mounts put the engine in the same relative location vertically HOWEVER it moved the engine forward 1" This meant I had to modify EVERYTHING. The driveline had to be lengthened, The transmission mount had to be modified (for the 4th time but that is a different post, or at least t will be ) the exhaust no longer fit. SO I have been fixing all the issues. It is all for the best most of them were things that needed to be fixed anyway. The drive line was a little short even with the old set up. The exhaust was a cobbled together mess, modified from another car and with the original mounts I used the back of the engine was really close to the firewall this made the transmission really tight in the transmission tunnel and required it to have a fairly steep angle. by moving it forward 1" I was able to raise the tail end of the transmission up about 1/2" to get a better transmission and engine angle. The transmission mount and the driveline have been taken care of but I still have to finish the exhaust. Oh the fun of custom work you change one thing and everything else changes too.
Offline
Daze,
I'm wondering if you are happy with the performance of your new 302. One day I also might swap a new motor into my 66 and if a 302 will give good performance I'll probably do it. Every now and then a 390ci comes up for sale in my area, so that might be an option too. Does your 62 have plenty of power with the 302?
Jay
Offline
Jayz66 wrote:
Daze, Does your 62 have plenty of power with the 302?
Jay
well yes... and no.
When I dropped the 302 and AOD in it was all stock except for a 4-barrel intake/carb, headers, and a performance ignition. The rotating assembly had over 100K on it but it was a TBI car before I carbureted it so I would guess it easily had another 50 to 100K left in it. 83 was one of the worst SBF OEM heads produced and the compression was only 8:1. All this coupled with the AOD and 3.00:1 rear end, the car was dog. Not much hard acceleration but it was a great cruising car and fun to drive at highway speeds.
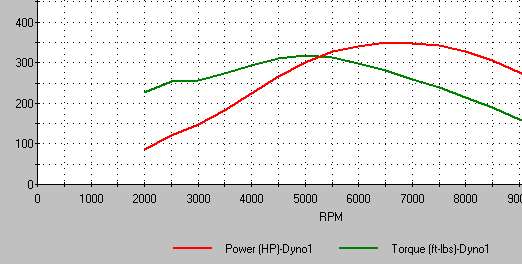
Virtual dyno numbers at the flywheel
Then I installed the T5 manual transmission, and it was like it was a whole different car. It still didn't have tones of off the line power but I was able to downshift any time I was looking for more power and it would come alive
Then I installed the new 302
4-barrel intake/carb
headers, and a performance exhaust
performance ignition
high flow aluminum heads 10:1 compression
roller rockers
Virtual dyno numbers at the flywheel
I have yet to have the car out on the road but the dyno numbers look very encouraging. what I really wanted for the car was a 351W but I could not pass up a fully machined rotating assembly with performance parts for only $800 and dropped in another 302. Eventually I will put lower gears in the rear which will help too.
Offline
I enjoy driving my 66 with the 289 but I'm always wondering if it drives the way it came from the factory. Very little power. I find myself shifting into low gear and keeping it there for a little more accelleration from 0 - 20. Maybe an adjustment to the tranny would help that some. Overall, it's a cruiser and nothing more. MPG is 14 if I baby it. I seem to get no extra power from my Autolite 4100 4V and I've often thought of going back to stock.
Sorry to hijack the thread with my questions which have nothing to do with fabrication.
One day I might have some fabrication skills and venture into a modification on my 66. I'd love to have a 5 speed and performance engine one day.
Offline
Hi Daze. A couple of years ago I started a 62 Galaxie project and used some of the info I found on this site as a getting started guide. For me, the thing that stood out from your posts was the importance of getting the engine and trans in the right place first, thank you for that!
When I bought the car, it was pre-butchered with a mid 60s 352 and C6. It was a poor installation, huge gobs of plate steel, terrible driveshaft angle, strange tink-tink-clunk from the torque converter area, huge vibration, etc.
I bought a cheap scrap 351W and AOD to see if that combo would fit. I initially tried your mount recommendation (anchor 2725 and 2726) on the original frame mounts but the engine sat too high in the bay and the transmission interfered with the tunnel. After trying a few ideas that ended in failure, I decided to cut off the frame mounts and replace them with 63-64 Galaxie frame mounts from Crites. I bolted the frame mounts to the engine, sat the eng-trans in place, tacked the frame mounts, removed the eng-trans, and finished the welding. This worked perfectly using the standard 63-64 Galaxie small block engine mounts. A custom transmission cross-member and a modified drive shaft were required.
I eventually replaced the scrap eng-trans with a good running 351W , AOD, and 3.70 gears, not a rocket but fun to drive!
Last edited by pmc650 (September 13, 2017 2:39 pm)
Offline
Some pictures of the working (not finished!) product, don't be too critical of the welds, first time with a welder since high school, almost 40 years ago!
Last edited by pmc650 (September 13, 2017 2:15 pm)
1 of 1